28/2/18

Trudy Turtelneck

Me and turtlenecks were never friends. But life changes, body changes, taste changes, and here I am absolutely proud of my new top. It was on my mind all winter long to try this style and I couldn't love it more.

Nunca me habían gustado los cuellos altos, pero por lo visto la vida, el cuerpo y los gustos cambian... y aquí estoy hoy para enseñaros mi nuevo jersey. Me he pasado el invierno con ganas de probar este estilo y una vez hecho no podría gustarme más.


I used the Trudy Turtelneck pattern by Wardrobe by Me and a beautiful canale jersey fabric from The Sweet Mercerie.

El patrón es el Trudy Turtelneck de Wardrobe by Me y la tela es un punto canalé precioso de The Sweet Mercerie.


Now I need to find something that combines with it for layering and keeping me warm, any ideas?

Ahora me toca encontrar algo que combine para llevar encima, que sino me congelo jeje... ¿alguna idea?


The patterns by WBM always fit me just right and I usually don't need to make any changes, which is just great! I cut size 38 graded to a 40 at the hips.

Los patrones de WBM parecen hechos a mi medida, porque casi nunca tengo que hacer ninguna modificación, y eso es genial. Cosí la 38 ampliando a la 40 en las caderas.


The day we took these pics I was freezing to death. Really looking forward to spring now!

El día que sacamos estas fotos me congelé de mala manera. ¡Quiero primavera ya!


Pattern: Trudy Turtelneck by Wardrobe by Me
Fabric: canale jersey from The Sweet Mercerie
Links: MiMi

21/2/18

Lady Tasja en compañía

Hoy repito Lady Tasja en muy buena compañía. Tanto Eva de Costurera de Retales como Yolanda de Pandielleando y yo misma ya cosimos este patrón hace unas semanas, y nos gustó tanto que nos lanzamos a por la segunda versión. Esta vez como camiseta. ¡No os perdáis las suyas porque son espectaculares!

A pattern is a big success when you like it so much that you inmediately want to sew it again. That's what happened to Eva from  Costurera de Retales, Yolanda from Pandielleando and myself. Today we show you our second version of Lady Tasja by Mialuna. 


Yo estuve mirando mis telas y no encontré ninguna combinación que me gustara, así que he optado por hacerla toda en la misma tela, y me gusta mucho el resultado. El canesú le da el toque de gracia aunque quede más discreto.

I was searching possible fabric combinations on my stash but nothing convinced me, so I ended up making it very plain, all in the same fabric, and I like it very much. It is a very wearable shirt with a nice detail on the neckline!


Mi primera versión, aquí, la hice con capucha. La he cosido sin cuello ni capucha pensando ya en la primavera, y las únicas modificaciones que hice fueron agrandar un poco el cuello y alargar cuerpo y mangas porque en el patrón llevan puño y yo lo he hecho sin.

I made the first one as a hoodie, you can see it here. For this one, I decided to go without hood or neck, already thinking about spring. Appart from that, the only changes that I made were to make the neckline a bit wider and lenghten body and sleeves, because the original pattern goes with cuffs.


En el bajo le he dado una forma ligeramente redondeada. Y he dejado las mangas sin acabar, porque me gusta cómo se enrollan. Si cambio de opinión siempre estoy a tiempo de hacerle el dobladillo.

I made a slightly rounded hem and left the sleeves unfinished, because I like how they roll up. Anyways, I can always hem it later if I change my mind.


Los patrones de Mialuna nunca defraudan. Y viendo todas las versiones posibles, Lady Tasja es un patrón de lo más versátil.

Mialuna's sewing patterns are always great. And Lady Tasja is so versatile!


La tela que he usado es un punto fino de algodón que compré en las rebajas de The Sweet Mercerie. Tiene un tacto muy agradable y un chispeado precioso.

I used a nice cotton jersey from The Sweet Mercerie. I made a huge order during their sales and was  very happily surprised with the quality!


Últimamente coso poco y tengo que agradecer a Eva y Yolanda el empujoncito. A veces lo único que necesitas es una excusa para ponerte a ello.

I am not sewing much lately, and I really need to thank Eva and Yolanda for making me find a moment to sit on the sewing machine. Sometimes all you need is an excuse to get started!


Y eso de usar el móvil como mando a distancia de la cámara es genial, pero lo que cuesta después que no se vea en las fotos jaja... Sigo familiarizándome con la cámara nueva y sacando fotos de interior, porque con este frío no me apetece nada quitarme la chaqueta cuando estoy fuera.

And yeah, using the phone as a remote control for the camera is really great, but then it is so hard to hide it in the pictures! Still trying to get familiarized with my new camera, and still taking pics indoors, because I really have no mood to take off the jacket when I am outside.


Pattern: Lady Tasja by Mialuna
Fabric: Cotton jersey from The Sweet Mercerie
Link: MiMi

8/2/18

Love Yourself

Sabes que tu cajón de la ropa interior necesita una renovación urgente cuando un día, al abrirlo, te quedas mirando y no eres capaz de encontrar unas bragas que te apetezca ponerte porque todas tienen algún que otro pero. Me entraron unas ganas locas de hacer una hoguera y echarlas todas al fuego. Pero antes necesitaba un plan renove. Aunque he cosido de varios tipos hasta ahora y han cumplido su función, ninguna acabó de ser perfecta o totalmente cómoda, por eso tenía ganas de probar un patrón nuevo, y por eso no me lo pensé dos veces cuando tuve la oportunidad de probar los tres nuevos patrones Love Yourself de Wardrobe by Me. Y en fin, aquí el resultado. Mis nuevas bragas me gustan tanto que incluso voy a quitarme los complejos y a enseñaros como quedan puestas, porque sin relleno es imposible apreciarlo.

You know that your underwear drawer needs a full renovation when one day you open it and there is nothing that you want to wear. I really felt like setting them all on fire, but first I needed a replacement! I have sewn different panties before, and they served their function, but none of them were really perfect or totally comfortable, so I was looking forward to try new patterns, and that's why I did not doubt for even a second when I got the chance to test the new Love Yourself patterns by Wardrobe by Me. And here is the result. I like my new underwear so much that I will even leave my self esteem issues aside and show you how they look on me, because that is the only way to appreciate how great they are.


Es todo un mundo, esto de la ropa interior. Todas tenemos cuerpos, gustos y preferencias diferentes. ¿Qué busco yo en la mía? Pues que me guste cómo me queda y que sea cómoda. No es pedir mucho, creo, pero a la hora de la verdad, sean compradas o cosidas, no es nada fácil dar con las bragas perfectas. Christina de WBM debió de leerme la mente, o más bien se dio cuenta de que hay muchas mujeres buscando lo mismo que yo, porque sus dos nuevos patrones son mi sueño hecho realidad.

Underwear is a big and complicated world. We all have different bodies, tastes and preferences. What do I look for in mine? Pretty and comfortable. It wouldn't seem like too much to ask for, right? But in reality, finding the perfect underwear is no easy task. Christina from WBM must have read my mind, or most probably she realized that many other women where seaking the same, because her two new patterns are really my dream come true.


Love Yourself Hipster y Love Yourself Panty. Ambos patrones incluyen múltiples opciones, lo que es ideal para probar varias cosas y ver qué te gusta más. El que veis a continuación es el Love Yourself Hipster, tiene tres alturas diferentes para la cintura y dos opciones para la apertura de las piernas. además de incluir instrucciones para terminarlo con FOE y con puño. La de la izquierda tiene la parte delantera más cerrada, estilo shorty o boy short, mientras que la de la derecha es más abierta. Me encantan las dos, y lo mejor es que, incluso sin elástico en las piernas, se mantienen en su sitio durante todo el día. Comodidad absoluta y en mayúsculas. Si a eso le sumas que pude aprovechar unos retales de tela orgánica de Nosh, es ya el no va más.

Love Yourself Hipster and Love Yourself Panty. Both include many options, which is great to try different things and find what you like the best. The one that I am showing you first is the Hipster. It has three different rise heights and two options for the leg openings and also includes instructions to finish them with bands of FOE. The one on the left is more closed, in boy short style, and the one on the right has a narrower crotch. I love them both and the best part of it is that they absolutely stay in place all day long without crawling into your bum or anything like that, even without using any elastic on the legs. Totally comfortable and super flattering. If you add to that that I was able to use some delicious Nosh organic fabric scraps, it is just heaven!


La marrón es con el tiro más alto, y la de rayas con la altura intermedia. La versión más baja también la probé, pero en mi cuerpo no me gustó tanto. Por eso es genial tener tantas opciones. Tampoco es que cueste mucho subir o bajar el tiro, pero si ya tienes la línea hecha, una cosa menos en la que pensar.

I made the brown hipsters with the high rise, and the striped one with the middle rise. I love them both. I also tried the lowest rise, but found it too low for me. But that is why it is great to have so many options. Not that it would be too hard to adjust the rise oneself, but if the pattern already includes different lines for that it is one less thing to worry about.


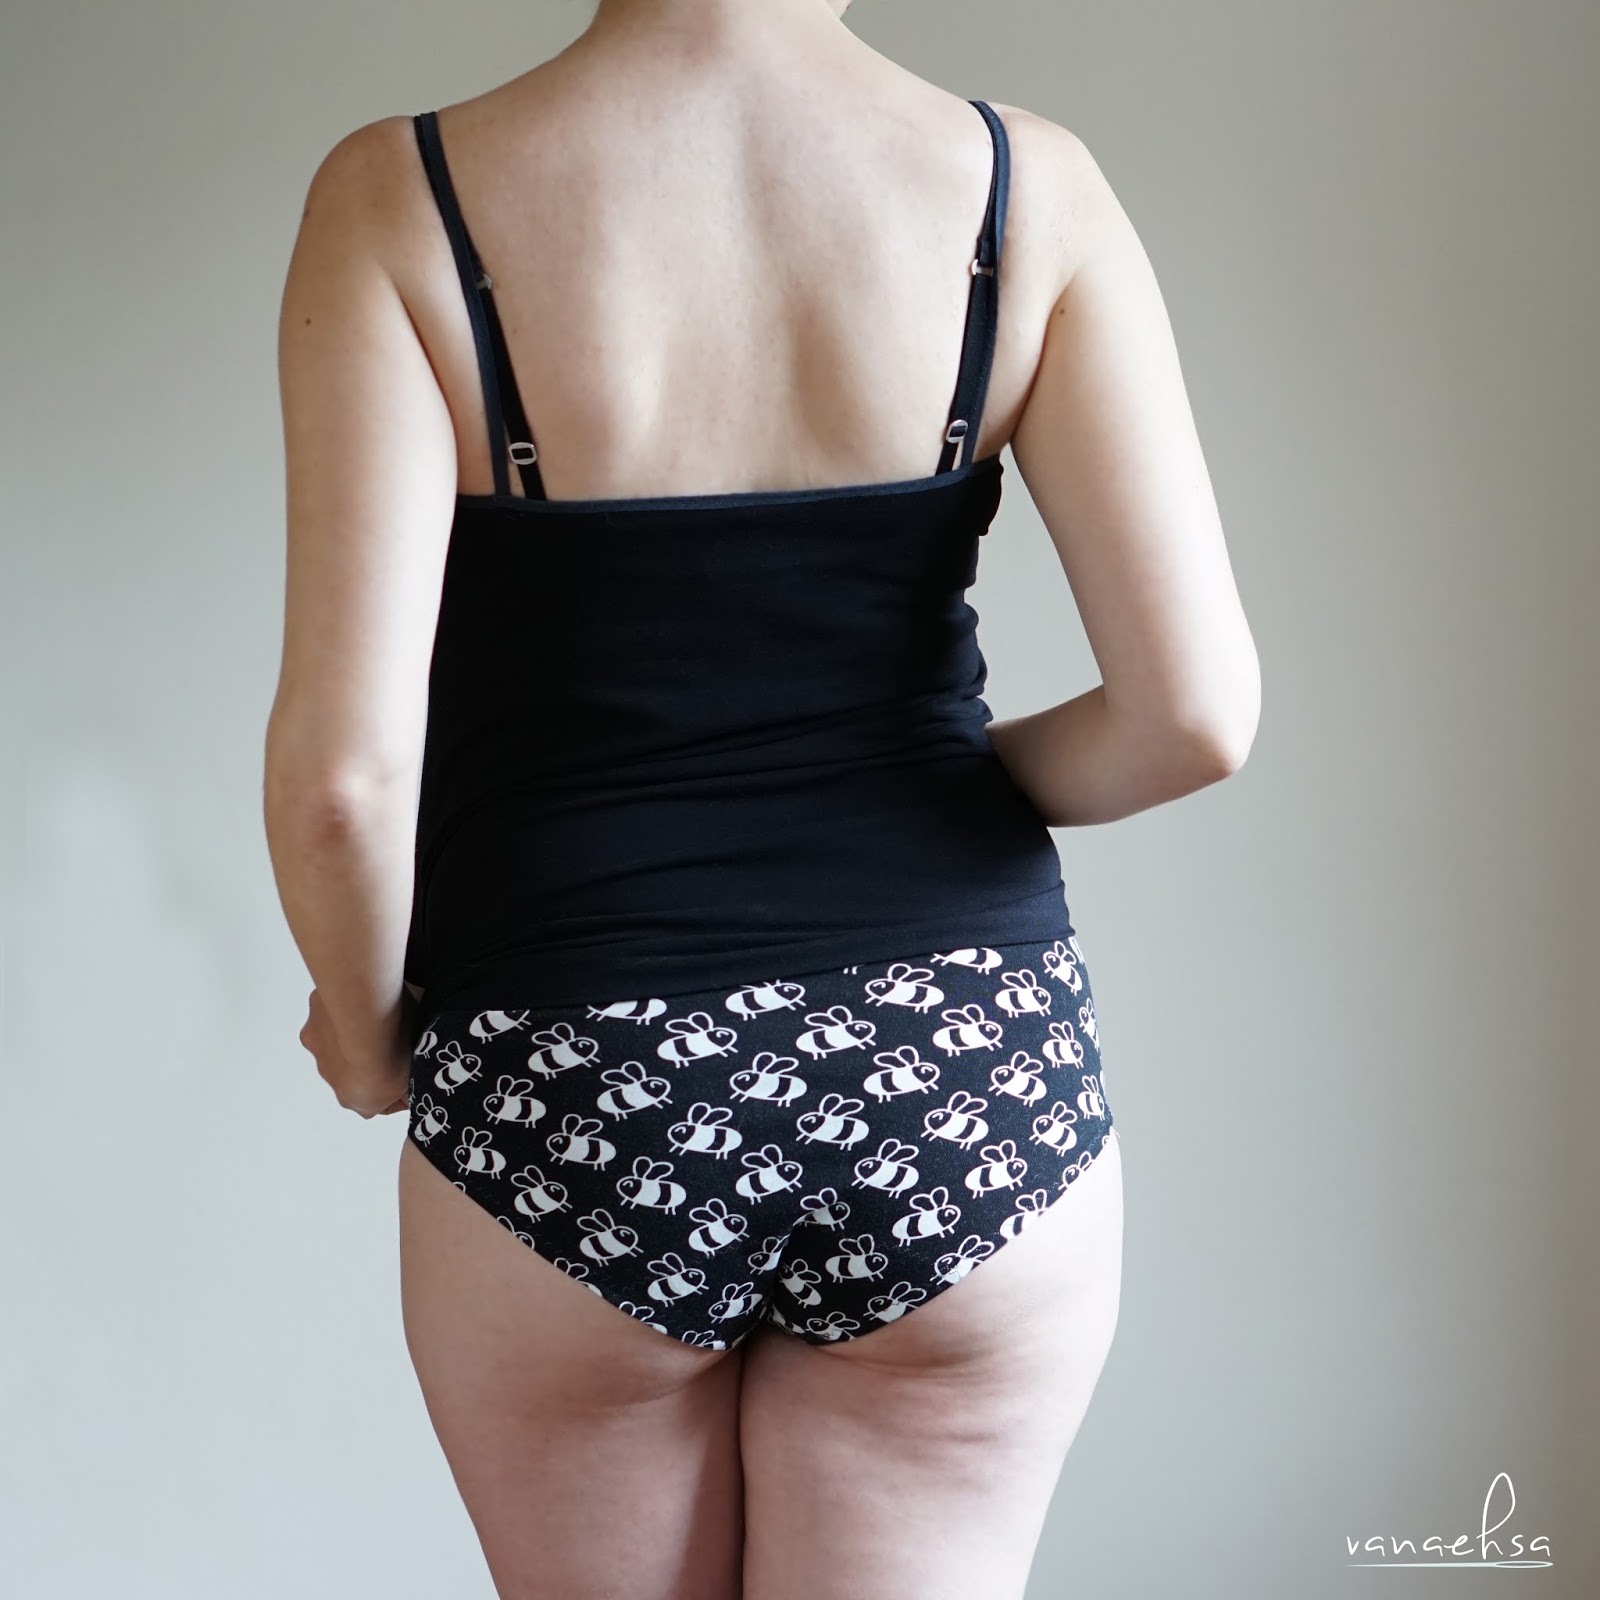
La camiseta de tirantes es el Carma Top, también de Wardrobe by Me, con el borde superior y los tirantes de FOE. También incluye el patrón para hacer los tirantes de la misma tela. Si os asusta el tema FOE, otra de las testers ha hecho un tutorial estupendo que podéis ver aquí. Ahora sí que voy a ir bien conjuntada. Esta camiseta tanto sirve como ropa interior como para el verano, me encanta la forma del escote.

The cami top is the Carma, also by Wardrobe by Me. I finished it with FOE, but the pattern also includes the piece to make the straps with the same fabric. If you don't dare with FOE, go check the great tutorial by Lone here. I think I've never own such a cute set before! I love the neckline of the cami and works great as underwear or as a summer top.


Esta vez me apetecía un estilo más discreto, así que tiré más de retales lisos y sin muchos colorines, con alguna excepción... Al final de la entrada os las enseño (casi) todas. 

This time I was in the mood for a more serious look, so I chose more plain and simple fabrics for almost all of them. At the end of the post you can see them (almost) all.


Desde luego, puedo decir que son las bragas más cómodas que he tenido nunca sin exagerar nada de nada. Por eso me he cosido un montón. Y más que me voy a coser.

Definetely, after several days of use I can say that these is the most comfortable underwear ever, and that's why I've made a whole lot of them and I've no intention to stop there!


A continuación, el segundo patrón, Love Yourself Panty, unas braguitas de corte más clásico. Solo me hice estas dos, porque me gustó más el otro, aunque ahora viendo las fotos veo que también me quedan genial y voy a hacerme más seguro. Estas, al ser más abiertas, me hicieron dudar entre hacerlas con o sin elástico en las aberturas de las piernas, así que probé una de cada, y también probé las dos alturas de la cintura que incluye el patrón.

Next you can see the second pattern, Love Yourself Panty, in a more classic style. I only did these two because I preferred the hipster on me, but now seeing the pictures I realize that these are super cute too and I should make more. This pattern is more open at the leg opening, so I wasn't sure about going without elastic, and I tried both.  


Las de la derecha llevan elástico y se mantienen genial en su sitio, aunque son demasiado bajas para mí. Las de la izquierda son las que llevo en la foto, más altas y sin elástico. Son muy cómodas también, y aunque no tienen el agarre del elástico se mantienen bastante bien en su sitio.

On the right, with elastic on the leg openings and the low rise. Super comfortable and stay in place all day, but I prefer the higher rise. On the left, high rise without elastic on the legs. This is the one I wear on the photos below and it is just great and will also stay in place.


Como me hice tantas, una cosa que sí noté es la diferencia que puede suponer la tela que elijas. Para todas (menos unas que hice de lana) utilicé punto de algodón con elastano, pero las calidades son distintas. Unas telas son algo más elásticas que otras o tienen una mejor o peor recuperación, y eso se nota. Mi recomendación sería sin duda usar una tela con buena elasticidad y recuperación. Según la tabla de medidas me tocaba la talla 40, pero al cabo de un rato de llevarlas, me las notaba algo grandes. El punto de algodón es transpirable y agradable con la piel, y es lo que quiero usar porque odio el poliester, pero a lo largo del día va dando de sí. Por eso opté por coser una 38. A otras testers les fue de maravilla la talla que les tocaba tal cual, así que al final, lo que hay que hacer es probar y ver qué funciona con tu cuerpo y tu tela.

Because I made so many of them, the one thing that I noticed is how much a difference the fabric choice makes. Except for one for which I used wool, I made all in cotton elastane jersey fabric, but their quality wasn't the same. I would really recommend to choose a fabric with good stretch and recovery. Otherwise you might need to play around with the size. In my case, I fell into size 40 in the chart, but then I felt them too lose after a while of wearing, so I finally chose to make a 38. The cotton jersey is great in terms of breathability and feeling comfortable, and is all I want to wear down there because I hate anything poly, but it does stretch out during the day, so I prefer to start with a tighter fit. Other testers felt great in their corresponding sizes from the chart, so it is really about playing around with the fabric and the pattern and see what works for you.


Y aquí el recopilatorio de toooodas las que cosí. Bueno, casi todas, porque dos estaban en la lavadora en el momento de hacer las fotos. Mis preferidas, las que no llevan elástico, aunque hay días que también apetece ir con todo más ajustado, y entonces es perfecto el FOE. También deciros que el refuerzo interior es un poco más grande de lo habitual, lo cuál me gusta mucho. En el patrón final, sin embargo, es más pequeño que en estas fotos, porque lo han reducido un poco.

Conclusión: dos patrones perfectos y totalmente recomendables. Soy fan total de WBM, sus patrones nunca decepcionan.

And here you can see all of them, except for two that were in the wash when I took the pics. My favourites are the ones without elastic on the legs, although I also love the FOE for those days when you prefer a tighter fit. I also really love that the liner is a bit bigger than usual, although on the final version it has been reduced a bit in comparison to my pics.

So, in short: two perfect patterns that I can only recommend. I am a big fan of WBM, their patterns never disappoint.


¡Y además salgo en dos portadas! ¡Y estreno cámara! Después de batallar un tiempo con los problemas de enfoque de nuestra cámara vieja, al final terminó muriéndose del todo, así que cámara nueva y no puedo estar más contenta. Es alucinante ver cómo ha evolucionado la tecnología en estos años.

And on top of that all, I made it to two covers!! How great is that! After a few months of focusing issues, our old camera finally died and we got a new one that I couldn't be happier with. It is crazy to see how the technology has evolved in these years!


Si quereis haceros con alguno de estos patrones, aprovechad la oferta de lanzamiento:

Con el código Love 20, 20% de descuento al comprar dos patrones de ropa interior.
Con el código Love 30, 30% de descuento al comprar tres patrones de ropa interior.
Oferta válida hasta el 16/02/2018.


If you like any of these patterns, don't miss your chance to get them during the release sale:

With code Love 20 get 20% off two underwear patterns.
With code Love 30 get 30% off three underwear patterns.
Sale ends 2/16-2018


--------------------------------------------------------------------------------------------------------------------------

Patterns: Love Yourself PantyLove Yourself HipsterCarma Top by Wardrobe by Me
Fabric: cotton elastane jersey, FOE, lingerie elastic.
Links: RUMS


24/1/18

Lady Tasja

Hoy vengo a MiMi muy bien acompañada, nada más y nada menos que de la mano de Yolanda de Pandielleando. ¡No os perdáis su versión chulísima aquí! Hace unos días estuvimos hablando de compartir patrón, que ya hacía tiempo de la última vez, y nos decidimos por dos aprovechando las rebajas a 2 euros de Makerist. Este es el primero, el segundo lo dejamos para dentro de unas semanas.

Today I am showing you a new hoodie that I've made with Yolanda from Pandielleando. Don't miss her super cool version here! Makerist had 2 euro sales again and we used our chance to choose two patterns to sew together. The second one will follow in a few weeks.


Es el Lady Tasja de Mialuna, un patrón de sudadera con capucha o cuello cruzados, canesú, bolsillos y dos largos diferentes. Yo me decidí por la capucha, omití los bolsillos e hice el largo sudadera. Me hubiese gustado más largo, pero la tela no llegaba. No pasa nada, así me encanta también. Justo hace un par de semanas, Costurera de Retales nos enseñaba su versión como vestido que me encantó.

This is Lady Tasja by Mialuna, a hoodie pattern that includes a crossed hood or neck, yoke, pockets and two different lengths. I chose the hood with no pockets and the shorter length. Would have liked it longer, but didn't have enough fabric. No problem, I love it like this too. A few days ago, Costurera de Retales shared her version in dress length, and I liked it so much!


Y es que se trata de un reciclaje, o un recosiendo como diría Mi Rincón de Mariposas.
¿Alguien se acuerda de la Hazel que cosimos en 2016? Aquí la mía. Pues desde entonces he adelgazado y se me había quedado enorme hasta el punto que ya no me la podía poner. Pues nada, la reciclamos y nos cosemos algo nuevo.

For the main fabric, I recycled another hoodie that I had sewn back in 2016 and you can see here. Since then, I have lost some weight and I could not wear it anymore, but the fabric is really beautiful so I gave it try and managed to recycle it into something nice and new.


La tela rosa es una sudadera que tengo en el armario desde hace años. Me dolía la vista de seguir viéndola ahí, pero es que es mucho rosa para hacerme algo entero con ella, por eso no le acababa de encontrar nunca proyecto. Hasta que tuve la idea de aprovecharla para dar un toque de color pero sin pasarme de rosa. Me encanta como queda, así asomando por la capucha y los puños.

The pink sweatshirt fabric has been in my fabric stash for ages and it really hurt my eyes to still see it there after so long. It is way too pink to make an entire garment out of it, and that's why I never found the right project for it. Until I had the idea to use it to give a touch of color but without going overboard with the pink. That way, I used it to line the hood and on the cuffs. I love how it looks!


Para hacer los puños dividí el patrón en dos, haciendo la parte rosa algo más larga que la negra, así sobresale una vez doblado. Tengo que decir que los puños han quedado algo estrechos, porque como los he hecho de sudadera y no de tela de puño, tendría que haberlos cortado un poco más anchos. Pero bueno, me pasa la mano, así que los aprobamos.

For the cuffs, I divided the pattern piece in two and cut the pink one a bit longer than the black, so that once folded the pink sticks out. I did a mistake there though... The cuffs are meant for ribbing and I made them out of sweatshirt fabric, so they ended up a bit too narrow. I should have cut them wider. But well, my hand gets through, so it is a pass.


Una parte de las mangas en negro, y una costura en el centro de la espalda que no viene en el patrón. Lo que tiene coser una cosa aprovechando otra. Pero me alegro mucho de este reciclaje, porque esta tela me encanta, y así me la voy a volver a poner incluso más que antes. Es una sudadera con velour que compré en Cal Joan. Super calentita.

Because I was recycling another garment I had to make some puzzle to fit it all in, that's why I added a black part on the sleeves (which I actually like a lot) and why the back has a center seam that the pattern doesn't include. But I am really happy that I was able to reuse this fabric that I really love. It is a very warm and cozy sweatshirt fabric with some kind of fleece inside, that I bought back then in Cal Joan


Hoy han tocado fotos de interior en una íntima sesión solos el trípode y yo, con una cámara que solo enfoca cuando le da la gana. En fin, tres mil fotos después, alguna hemos podido aprovechar. Creo que toca llevarla a revisión... Intentamos abrirla nosotros para solucionar el problema de enfoque siguiendo un vídeo de youtube jaja... de perdidos al río, pensamos. Y algo mejoró, pero aún no va bien del todo. Comprar cámara nueva, ahora mismo va a ser que no. Así que... tendremos que hacer muchas fotos para tener unas cuantas entradas del blog cubiertas y llevarla a ver si nos la reparan. ¿Alguna sugerencia?

This time I had a very intimate photo session just the tripod and I, with a camera that only focuses well whenever it is in the mood. Anyway, after three thousand photos, some of me came out usable. I think it is time to send the camera to repair. We tried to open it ourselves following a youtube video lol... And it did get somewhat better, but it did not completely solve the problem. So I think that it will be time to send it to repair, because getting a new one is not an option at the moment. Any suggestions? 


Patrón: Lady Tasja de Mialuna
Tela: sudadera con velour de Cal Joan
Enlaces: MiMi

23/1/18

Sein NANUK II

A few weeks ago I showed you here the cool zipper hoodie that I made for Ribi with the Sein NANUK pattern by Meine Herzenswelt. So today I am here to show the second one that I made, although it actually was the first one.

Hace unas semanas os enseñé aquí la sudadera chula que le hice a Ribi con el patrón Sein NANUK de Meine Herzenswelt. Pues bien, os enseño la segunda, o más bien la primera que hice.


I was part of the tester team, and this was the first try on the pattern, a simple version with no zipper.

Como parte del equipo tester, esta fue la primera que hice, así simple sin cremallera ni historias, para probar el patrón.


Truth is that this has become one of his favorite sweatshirts. Sometimes less is more, and more simple means more wearable.

Y la verdad es que se ha convertido en una de sus sudaderas favoritas. A veces menos es más, y lo más sencillo es lo más ponible.


Here I made it with a hood and kangaroo pocket, whereas the other one was with high neck, zipper and pockets on the front side seams. It is just great when a pattern includes so many options.

Aquí hice capucha y bolsillo canguro, mientras que la otra era con cuello, cremallera y bolsillos en las costuras laterales delanteras. Es genial cuando los patrones llevan tantas opciones.


We took the pictures in the Fageda d'en Jordà, a beautiful and magical forest.

Las fotos en la Fageda d'en Jordà... Hacía siglos que no íbamos y es un lugar taaaan bonito.


Not much writing today, I don't have time! Life is stressful people...

No me enrollo mucho hoy, que últimamente estoy un poco falta de tiempo, por no decir que estoy con un estrés que uf...


Sewing for my husband is always a pleasure. This is the last piece of sewing for him that I had pending to show you, but I am sure that more will follow soon.

Me encanta coser para Ribi. Esta era la última costura suya que tenía pendiente de enseñaros, pero seguro que pronto caen más.


Fabric: Winter sweatshirt fabric from Driessenstoffen
Pattern: Sein NANUK by Meine Herzenswelt
Links: Mr Handmade

16/1/18

Draper Polo by Wardrobe by Me

Anyone else looking forward to the warm weather? We are a bit tired of winter here already, and there is no better way to forget about the cold than putting oneself into summer sewing mode for a while. It wasn't that fun to go outside in a t-shirt for the pictures afterwards, but well, he didn't complain that much because he loves his new Draper Polo, the new sewing pattern by Wardrobe by Me!

Por aquí empezamos a estar un poco hartos del frío, así que hace unos días me puse en modo costura primaveral para olvidarme del invierno por un rato. Salir a tomar fotos en manga corta no fue tan divertido pero, como le encanta su nueva camiseta, tampoco se quejó mucho jeje. Así que nada, aquí estoy hoy para hacer mi pequeña aportación al #maromartes y al Mr. Handmade y presentaros el Draper Polo, el nuevo patrón de Wardrobe by Me.


The Draper Polo is a classic men's polo shirt with front placket, collar and optional pocket. It has a side slit with the back slighlty longer and includes two sleeve lengths and also the option of crew neck for a basic T-shirt.

La Draper Polo es una camiseta de polo clásica para hombre, con su cuello polo, bolsillo opcional y un corte lateral con el trasero un poco más largo. Incluye dos largos de mangas y también la opción de cuello de camiseta normal.


The pattern goes from 2XS to 3XL. For Ribi, I made size M, choosing from the chart according to the chest measurement, and the fit is perfect. 

El patrón abarca las tallas 2XS - 3XL. Para Ribi cosí la talla M, según la medida de pecho de la tabla de medidas, y le va clavada.


I used cotton jersey with elasthane that I got during my holidays in France last year. Because fabric shops have of course become part of any trip and sightseeing tour since I started sewing :-D. I already envisioned a polo shirt when I bought it, so this tester call was the perfect excuse to finally use it. I combined it with solid navy jersey on the collar and the pocket, to add some contrast.

La tela es punto de algodón con elastano que compré el año pasado en Francia durante las vacaciones. Porque evidentemente, desde que coso, las tiendas de telas forman parte de cualquier ruta turística :-D. Ya la compré pensado en una camiseta polo, así que este tester call fue la excusa perfecta para hacerla por fin. La combiné con azul marino liso para añadir un poco de contraste.


It is a beautifully drafted pattern, perfect to add some love to our men's wardrobes. The Draper Polo pattern by WBM was released yesterday and will be on sale until 26th January, don't miss your chance if you like it!

Es un patrón muy bien hecho, como todos los de WBM, perfecto para llenar el armario de nuestros chicos. El Draper Polo salió a la venta ayer y estará de oferta hasta el 26 de enero, así que si os gusta, ¡no perdáis la oportunidad!


Pattern: Draper Polo by Wardrobe by Me
Fabric: Cotton elasthane jersey bought in France
Links: Mr. Handmade


10/1/18

Bellavista Top by Itch to Stitch

Después de unas semanas de parón debido a las fiestas, el trabajo y la gripe, hoy estoy de vuelta con un patrón chulísimo, el nuevo Bellavista Top de Itch to Stitch.

After a few weeks without posting because of the holidays, the work and the flu, today I am back with an amazing pattern, the new Bellavista Top by Itch to Stitch.


Cuando salió el tester call no lo dudé ni un segundo, porque me encantan los cuellos enormes. Y no podría estar más contenta con el resultado. El patrón trae este cuello y otro normal, y dos largadas de mangas: largas y 3/4. Las 3/4 son un poco acampanadas y muy monas, pero estamos en invierno, así que yo opté por cuello grande y mangas largas.

I did not doubt for even a second when I saw this tester call, because I love big cowl necks. And I couldn't be happier with the result. The pattern has several options: big cowl or scoop neck, and long or 3/4 sleeves. The 3/4 sleeves are really sweet with a beautiful bell shape at the bottom, but it is winter and cold, so I went for the warmest options: long sleeves and cowl neck.


Elegí una tela de punto de lana bastante gruesa. Le da mucho cuerpo al jersey y hace que se me separe del cuerpo en la parte de abajo. ¡La verdad es que me gusta mucho! Con una tela más fina tendría más caída y también quedaría bien. Por ejemplo, como el que se hizo la Doctora Botones aquí.

I chose a heavy weight wool sweater knit. It is quite thick and has a lot of body, so the sweater separates from my body at the bottom, which I actually like a lot! With a lighter weight fabric though, the results are also really nice, like this one by Doctora Botones.


El delantero lleva una panel central, ideal para combinar telas, o para darle un toque de gracia aunque uses la misma. Cosí la talla 6, que es la que me tocaba según mis medidas, y la única modificación fue alargar el cuerpo 3 cm.

The pattern has a central panel on the front, which is ideal to combine different fabrics, or also adds a little detail even if you make it all in the same fabric. I made size 6, according to measurement chart, and the fit is perfect. The only change that I did was lenghten the body 3 cm.


Es una costura rápida y las instrucciones en inglés son muy claras y detalladas, como todos los patrones de Itch to Stitch.

It is a quick sew and the instructions are really clear and well explained, as always with Itch to Stitch.


Sin duda, lo que me tiene más enamorada es ese cuello enorme y calentito. Y esa tela es tan agradable. La única pega es que suelta mucho pelo. Pero mucho mucho, una cosa exagerada. Espero que se solucione con algunos lavados.

Without a doubt, what I love the most is that big cozy chunky cowl neck. And the fabric is so warm and soft to the touch. Dreamy. But there is a but... It sheds a lot of fuzz. In a really crazy way. I hope that will get solved after a few washes.


Y hasta aquí la entrada de hoy. ¡Feliz miércoles a tod@s! Yo voy aún a medio gas, recuperándome de la peor gripe de la historia. Malditos virus.

And that's it for today. Happy Wednesday everyone! I am still recovering from the worst flu ever, damm those virus.


Patrón: Bellavista Top de Itch to Stitch
Tela: punto de lana de La Casa dels Trossos
Links: MiMi

Pattern: Bellavista Top by Itch to Stitch
Fabric: wool sweater knit from La Casa dels Trossos
Links: MiMi